The first time I encountered a true garlic bread roll, I was fifteen and working my first job at a small Italian bakery downtown. Mrs. Benedetti, the owner’s grandmother, would arrive each morning before dawn to begin the day’s bread production. I’d watch her weathered hands work the dough with an intuitive rhythm that spoke of decades spent in conversation with flour and yeast.
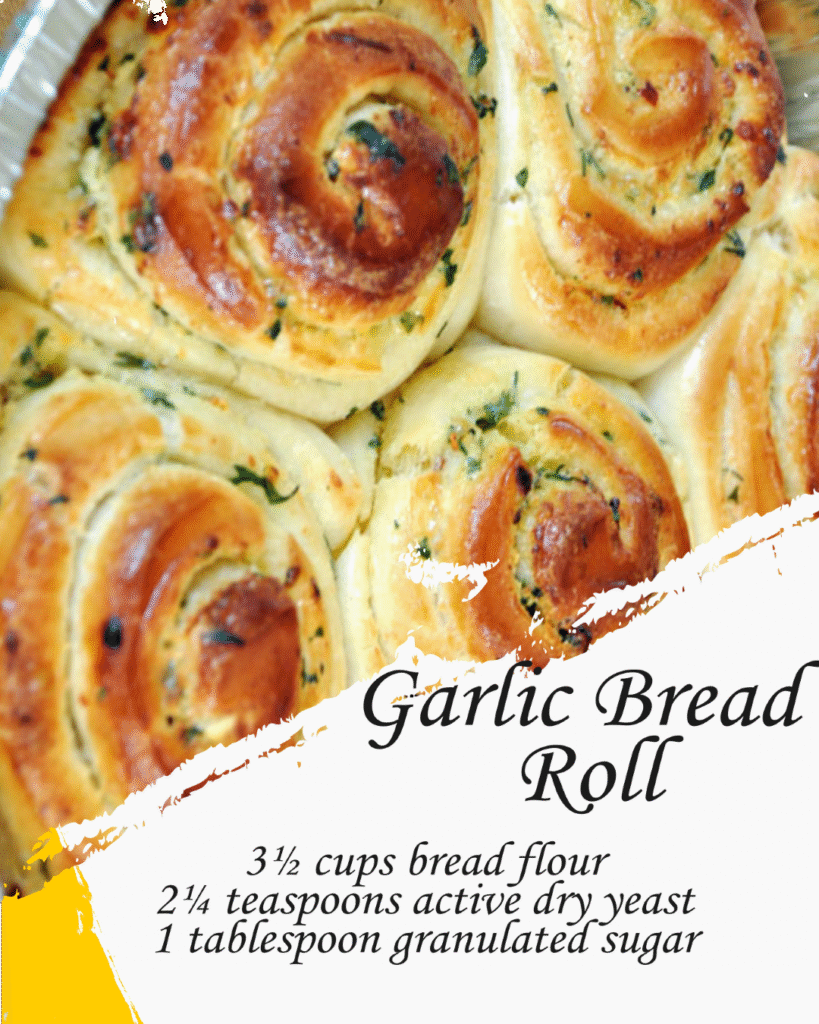
One particularly busy Saturday, she pulled a tray of golden, twisted rolls from the oven, their surfaces glistening with herb-flecked butter. The aroma was intoxicating – warm bread mingling with roasted garlic and fresh parsley. She handed me one, still steaming, with a knowing smile. That first bite was a revelation: the exterior crackling softly under my teeth, giving way to tender, pillowy bread within, each layer infused with rich, mellow garlic that had been coaxed into sweet perfection through slow roasting.
Years later, I’ve recreated that moment countless times in my own kitchen, perfecting this recipe that transforms simple ingredients into something extraordinary. These rolls have become my signature contribution to family gatherings, the dish that disappears first from potluck tables, and the comfort food I turn to when I need to fill my home with warmth and belonging.
Table of Contents
Why You’ll Love This Recipe
This garlic bread roll strikes the perfect balance between rustic charm and refined flavor. Unlike flat garlic bread, these individual rolls develop a beautiful golden crust while maintaining an incredibly soft interior. The garlic mixture penetrates deep into the dough’s spirals, ensuring every bite delivers that perfect harmony of buttery richness and aromatic herbs. They’re substantial enough to serve alongside soup or salad, yet elegant enough for dinner parties. Best of all, they can be prepared ahead and baked fresh when needed.
Ingredients
For the Dough:
- 3½ cups bread flour, plus extra for dusting
- 2¼ teaspoons active dry yeast (1 packet)
- 1 tablespoon granulated sugar
- 1¼ teaspoons salt
- 1 cup warm water (110°F)
- 3 tablespoons olive oil
For the Garlic Butter Filling:
- 6 tablespoons unsalted butter, softened
- 4 large garlic cloves, minced
- 2 tablespoons fresh parsley, finely chopped
- 1 teaspoon dried oregano
- ½ teaspoon salt
- ¼ teaspoon black pepper
For Finishing:
- 2 tablespoons melted butter
- Flaky sea salt for sprinkling
- Additional fresh parsley for garnish
Instructions
Begin by creating the foundation of these remarkable rolls. In a large mixing bowl, whisk together the flour, yeast, sugar, and salt. This dry mixture becomes the canvas upon which all other flavors will build. Create a well in the center and pour in the warm water and olive oil. The water temperature is crucial here – too hot and you’ll kill the yeast, too cool and the dough won’t rise properly. It should feel comfortably warm against your wrist, like a perfect bath.
Using a wooden spoon or your hands, bring the ingredients together into a shaggy dough. Don’t worry about perfection at this stage; the magic happens during kneading. Turn the dough onto a lightly floured surface and knead for eight to ten minutes. This rhythmic process develops the gluten strands that give the rolls their tender yet structured texture. You’ll know you’re done when the dough transforms from rough and sticky to smooth and elastic, springing back when gently poked.
Place the kneaded dough in an oiled bowl, turning once to coat all surfaces. Cover with a damp kitchen towel and set in a warm, draft-free location. I often use the top of my refrigerator or, on cold days, inside the oven with just the light on. The dough will double in size over the next hour to ninety minutes, expanding with the quiet patience that only yeast can teach us.
While the dough rises, prepare the garlic butter that will transform these simple rolls into something extraordinary. In a medium bowl, combine the softened butter with minced garlic, fresh parsley, oregano, salt, and pepper. The key to perfect garlic bread is using fresh garlic that’s been minced finely enough to distribute evenly but not so fine that it disappears entirely. Each piece should be small enough to bite through easily but large enough to provide bursts of flavor.
Once the dough has doubled, punch it down gently – there’s something deeply satisfying about releasing all that captured air. Turn it onto a lightly floured surface and roll into a large rectangle, approximately 12 by 18 inches. The dough should stretch willingly at this point, having relaxed during its rise.
Spread the garlic butter mixture evenly across the dough’s surface, leaving a half-inch border along one long edge. This border will become the seal when you roll the dough. Starting from the opposite long edge, roll the dough tightly into a log, pinching the seam closed when you reach the end.
Using a sharp knife or bench scraper, cut the log into twelve equal pieces. I find it helpful to mark the halfway point first, then quarter sections, then cut each quarter into three pieces. This ensures uniformity, which means even baking. Arrange the cut rolls in a greased 9×13 inch baking dish or on a parchment-lined baking sheet, leaving space between each one for their final rise.
Cover the shaped rolls with a kitchen towel and let them rise again for thirty to forty-five minutes. This second rise, called proofing, allows the rolls to nearly double in size once more. They should look puffy and feel light when gently touched. During this time, preheat your oven to 375°F.
When ready to bake, brush the tops of the rolls with melted butter – this creates that beautiful golden finish we’re after. Sprinkle lightly with flaky sea salt, which adds a subtle crunch and enhances all the other flavors.
Bake for 18 to 22 minutes, until the tops are golden brown and the rolls sound slightly hollow when tapped. The kitchen will fill with an aroma that draws people from every corner of the house. Remove from the oven and immediately brush with any remaining melted butter, then sprinkle with fresh parsley for a pop of color and freshness.
Chef’s Notes
These rolls are at their absolute best served warm from the oven, when the exterior is still crispy and the interior impossibly tender. However, they reheat beautifully in a 350°F oven for five to seven minutes, covered with foil to prevent over-browning. For make-ahead convenience, prepare through the cutting stage, cover tightly, and refrigerate overnight. Allow them to come to room temperature and complete their final rise before baking. The rolls freeze well too – wrap individually and freeze for up to three months, then thaw and reheat as needed.
Servings: 12 rolls
Total Time: 3 hours (including rising time)