The first time I attempted cream puffs, I was seventeen and wildly overconfident in my baking abilities. My grandmother’s kitchen became a battlefield of deflated pastries and custard disasters that left me questioning whether some culinary magic was simply beyond my reach. Twenty years later, standing in that same kitchen after her passing, I found her handwritten notes tucked between recipe cards: “Patience, dear one. The steam does the work, not your worry.” Those words unlocked something profound about this seemingly intimidating dessert.
Cream puffs aren’t just pastries; they’re small miracles of physics and faith. The way flour, butter, water, and eggs transform through heat into golden, hollow vessels capable of cradling silky custard feels like alchemy. That afternoon, following my grandmother’s gentle guidance from beyond, I finally understood that cream puffs aren’t about perfection—they’re about trust. Trust in the process, in the steam, in the simple magic that happens when you stop overthinking and start feeling your way through each step.
Now, whenever life feels overwhelming, I make cream puffs. There’s something deeply grounding about watching choux pastry puff in the oven, about stirring custard until it coats a spoon just so. These delicate treats have become my meditation, my way of honoring both tradition and the beautiful unpredictability of homemade desserts.
Table of Contents
Why You’ll Love This Recipe
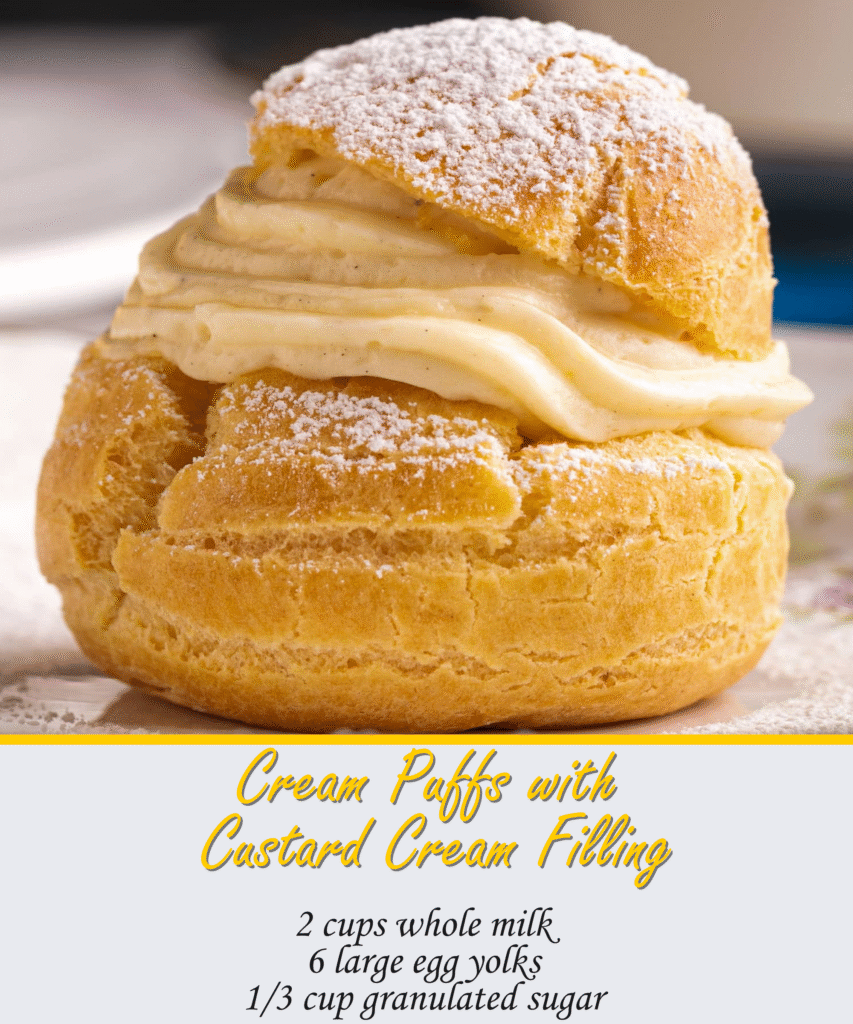
These cream puffs represent everything beautiful about classic French pastry made accessible in your home kitchen. The choux pastry creates perfectly crisp shells with tender, airy interiors, while the vanilla custard filling delivers pure silky indulgence. Unlike many pastries that require specialized equipment or techniques, cream puffs rely on simple ingredients and careful attention—skills every home baker can master with practice and patience.
Ingredients
For the Choux Pastry:
- 1 cup water
- 1/2 cup unsalted butter
- 1/4 teaspoon salt
- 1 cup all-purpose flour
- 4 large eggs, room temperature
For the Vanilla Custard Cream:
- 2 cups whole milk
- 6 large egg yolks
- 1/3 cup granulated sugar
- 1/4 cup cornstarch
- 1/4 teaspoon salt
- 3 tablespoons unsalted butter
- 2 teaspoons pure vanilla extract
For Assembly:
- Powdered sugar for dusting
Instructions
Begin with the custard cream, as it needs time to chill and develop its luxurious texture. In a heavy-bottomed saucepan, warm the milk over medium heat until small bubbles form around the edges—this gentle heating prevents the scorching that can ruin custard’s silky smoothness. While the milk warms, whisk together egg yolks and sugar in a separate bowl until the mixture turns pale and thick, about three minutes of vigorous whisking. This step matters more than most people realize; properly beaten yolks create custard’s characteristic richness.
Add cornstarch and salt to the egg mixture, whisking until completely smooth. The cornstarch acts as insurance against curdling, but it must be thoroughly incorporated to avoid lumps. When the milk is steaming but not boiling, slowly drizzle about half into the egg mixture while whisking constantly. This tempering process prevents the eggs from scrambling—a lesson I learned through several disappointing batches in my early baking days.
Return the entire mixture to the saucepan and cook over medium heat, whisking constantly, until it thickens to coat the back of a spoon, about three to five minutes. The custard should bubble gently as it thickens; this bubbling ensures the cornstarch fully activates. Remove from heat and immediately whisk in butter and vanilla, creating a glossy finish that speaks of professional pastry kitchens.
Press plastic wrap directly onto the custard’s surface to prevent a skin from forming, then refrigerate for at least two hours. This chilling time allows flavors to meld and the texture to perfect itself.
For the choux pastry, preheat your oven to 425°F and line a large baking sheet with parchment paper. In a medium saucepan, combine water, butter, and salt, bringing to a rolling boil over high heat. The butter should melt completely as the water boils—this union creates the foundation for our pastry’s structure.
Remove the saucepan from heat and immediately add all the flour at once, stirring vigorously with a wooden spoon. The mixture will seem shaggy at first, but keep stirring until it forms a smooth ball that pulls away from the sides of the pan. Return to low heat for about one minute, stirring constantly, to cook out the flour’s raw taste. This brief cooking creates the proper texture for absorbing eggs.
Transfer the hot mixture to a large bowl and let it cool for about five minutes—hot pastry will cook the eggs instead of incorporating them. Add eggs one at a time, beating thoroughly after each addition. The first egg might make the mixture look broken, but persist; each subsequent egg will create a smoother, more cohesive dough. After all eggs are incorporated, the pastry should be smooth, glossy, and fall from the spoon in a thick ribbon.
Using a large spoon or piping bag, create mounds of pastry about two inches apart on the prepared baking sheet. Each mound should be roughly the size of a golf ball—they’ll double in size during baking. Bake for 20 minutes at 425°F, then reduce temperature to 375°F and continue baking for 10-15 minutes until golden brown and crisp.
Here’s where patience becomes crucial: resist the urge to open the oven door during the first 20 minutes. The steam inside each puff needs consistent heat to create those hollow interiors. The cream puffs are done when they’re deeply golden and feel light for their size when gently lifted.
Remove from oven and immediately pierce each puff with a sharp knife to release steam—this prevents collapse as they cool. Let cool completely on a wire rack before filling.
To assemble, cut each cream puff in half horizontally or create a small opening with a sharp knife. Fill generously with chilled custard cream using a spoon or piping bag. The contrast between crisp pastry and smooth custard creates textural magic in every bite.
Chef’s Notes
Cream puffs are best served within a few hours of filling, though unfilled shells can be stored in an airtight container for up to two days. If they lose their crispness, refresh them in a 350°F oven for five minutes before cooling and filling. The custard can be made up to three days ahead and refrigerated. For variations, try adding lemon zest to the custard or a touch of almond extract to the pastry. These techniques transform a classic recipe into something uniquely yours.
Serves: 12-16 cream puffs
Total Time: 3 hours (including chilling time)