The first time I understood the true power of bread was during a particularly dreary Tuesday evening when my grandmother invited me into her small kitchen. Rain drummed against the windows while she pulled apart warm dinner rolls, releasing clouds of steam that carried the intoxicating aroma of roasted garlic and fresh herbs. Each bite was a revelation – pillowy soft interior giving way to a golden, slightly crispy exterior that had been lovingly brushed with garlic-infused butter. That evening, watching her weathered hands work the dough with practiced ease, I realized that some recipes aren’t just about feeding the body; they’re about nourishing the soul. These garlic dinner rolls became my inheritance from her kitchen, a recipe that has since graced countless family tables and turned ordinary meals into cherished memories. The magic lies not just in the combination of simple ingredients, but in the transformation that occurs when flour, yeast, and love come together in perfect harmony.
Table of Contents
Recipe Overview
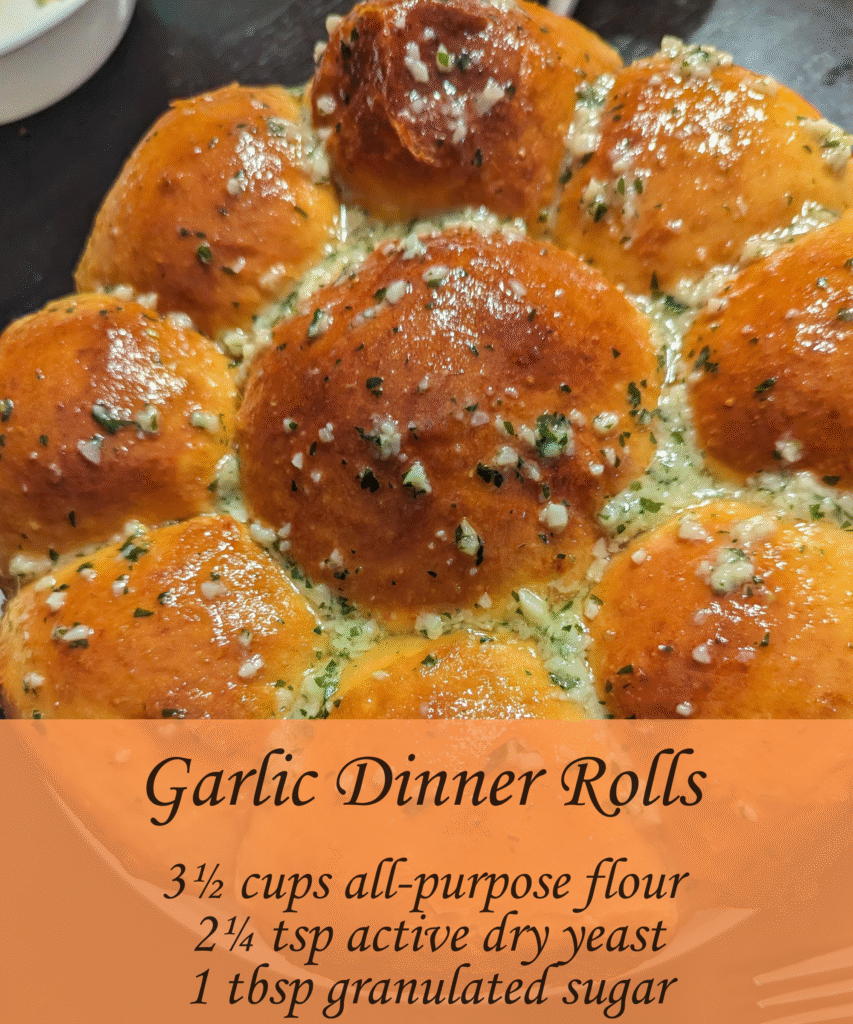
These garlic dinner rolls represent everything a perfect dinner roll should be: impossibly soft, wonderfully aromatic, and irresistibly buttery. What sets them apart is the double dose of garlic – both mixed into the dough and brushed generously on top – creating layers of flavor that complement rather than overwhelm. The texture strikes that perfect balance between substantial enough to hold up to hearty stews and delicate enough to melt in your mouth with just a touch of butter.
Ingredients
For the Rolls:
- 3½ cups all-purpose flour, plus extra for dusting
- 2¼ teaspoons active dry yeast (1 packet)
- 1 tablespoon granulated sugar
- 1 teaspoon salt
- 1 cup warm whole milk (110°F)
- 3 tablespoons unsalted butter, melted
- 1 large egg, room temperature
- 3 cloves garlic, minced
For the Garlic Butter Topping:
- 4 tablespoons unsalted butter, melted
- 2 cloves garlic, minced
- 1 tablespoon fresh parsley, finely chopped
- ½ teaspoon sea salt
Instructions
Begin by creating the foundation of these magnificent rolls – the yeast mixture. In a small bowl, combine the warm milk with sugar, stirring gently until the sugar dissolves completely. The milk should feel like a comfortable bath temperature against your wrist; too hot and you’ll kill the yeast, too cool and it won’t activate properly. Sprinkle the yeast over the surface and let it rest for about five minutes. This is where patience becomes your greatest ally. Watch as the mixture begins to foam and bubble, releasing that distinctive yeasty aroma that signals life awakening. This step is crucial because active yeast is what gives our rolls their incredible lift and tender crumb.
While the yeast works its magic, prepare your workspace by lightly flouring a clean surface and gathering your remaining ingredients. In a large mixing bowl, whisk together the flour and salt, creating small wells in the mixture. This isn’t just busywork – properly distributed salt ensures even flavor throughout each bite, while the wells help incorporate wet ingredients more evenly. Add the minced garlic to the flour mixture, using your fingers to distribute it throughout. The raw garlic will mellow beautifully during the rising and baking process, infusing the entire roll with aromatic warmth.
Create a well in the center of your flour mixture and pour in the foamy yeast mixture, followed by the melted butter and beaten egg. Here’s where the real transformation begins. Using a wooden spoon or your hands, gradually incorporate the flour into the wet ingredients, working from the center outward. The dough will appear shaggy and rough at first – don’t worry, this is exactly what we want. Once the mixture comes together into a cohesive mass, turn it onto your floured surface and begin kneading.
Kneading is where bread-making becomes almost meditative. Push the dough away from you with the heel of your hand, fold it back over itself, give it a quarter turn, and repeat. The rhythm becomes hypnotic, and you’ll feel the dough gradually transform under your hands. Initially sticky and rough, it will slowly become smooth and elastic, developing the gluten structure that gives our rolls their perfect texture. This process takes about eight to ten minutes of steady work, but you’ll know it’s ready when the dough springs back gently when poked with your finger.
Place the kneaded dough in a lightly oiled bowl, turning it once to coat all surfaces. Cover with a clean kitchen towel and set in a warm, draft-free location. The first rise is a lesson in anticipation – over the course of one to one and a half hours, the dough will double in size, developing flavor compounds that make the difference between ordinary and extraordinary bread. I often place mine on top of the refrigerator, where gentle warmth from the appliance creates the perfect environment for rising.
Once doubled, gently punch down the dough, releasing the built-up gases with a satisfying whoosh. Divide the dough into twelve equal portions – I find that using a kitchen scale here ensures perfectly uniform rolls, but eyeballing works fine too. Shape each portion into a smooth ball by pulling the dough taut and pinching the seams underneath. This technique creates surface tension that helps the rolls hold their shape and rise evenly.
Arrange the shaped rolls on a parchment-lined baking sheet, leaving about two inches between each one. Cover again and let rise for another thirty to forty-five minutes, until they’re puffy and nearly touching. Meanwhile, preheat your oven to 375°F and prepare the garlic butter topping by combining melted butter with minced garlic, parsley, and sea salt. The aroma of this mixture alone will have your family gathering in the kitchen.
Just before baking, brush each roll generously with the garlic butter mixture, making sure to get into all the crevices. Reserve some mixture for after baking – trust me on this. Slide the pan into the preheated oven and bake for fifteen to eighteen minutes, until the tops are golden brown and the rolls sound hollow when tapped gently. The kitchen will fill with the most incredible aroma, a combination of yeast, garlic, and browning butter that signals something special is about to happen.
Remove from the oven and immediately brush with the remaining garlic butter mixture while the rolls are still hot. This final step ensures maximum flavor penetration and creates that glossy, appetizing finish that makes these rolls irresistible. The butter will soak into the warm bread, creating pockets of flavor throughout each bite.
Chef’s Notes
These rolls are best served warm from the oven but will keep beautifully for up to three days stored in an airtight container. To refresh day-old rolls, wrap them in damp paper towels and microwave for fifteen to twenty seconds, or warm them in a 350°F oven for about five minutes. For make-ahead convenience, you can shape the rolls and refrigerate them overnight after the first rise – just let them come to room temperature and complete the second rise before baking. Feel free to experiment with herb variations; rosemary, thyme, or oregano all pair beautifully with the garlic.
Servings: 12 rolls
Total Time: 3 hours (including rising time)